Installing Memos in Proxmox with Backup on Synology
Step-by-Step Guide to Install Memos in a Proxmox LXC Container with Synology NAS Backups and Secure Remote Access via Tailscale.
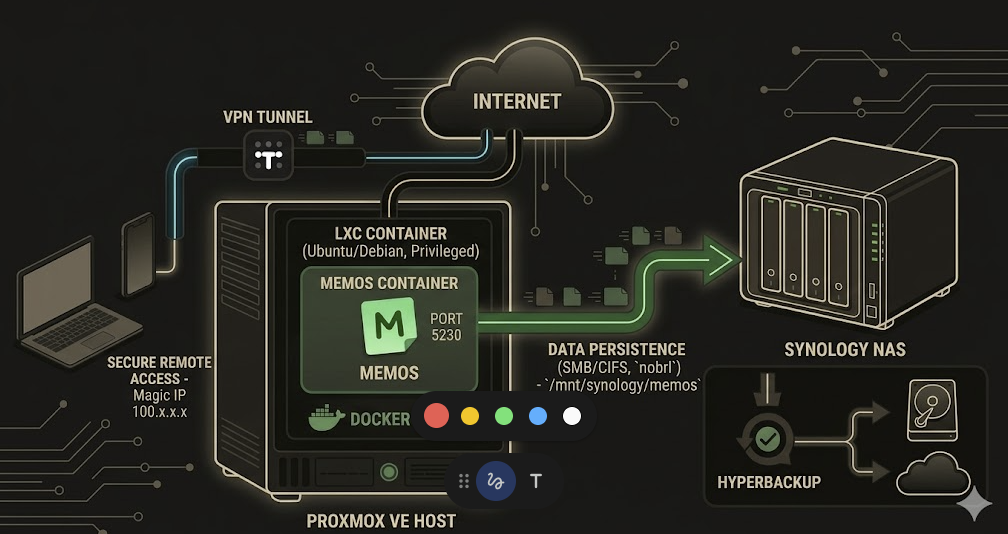
Objective: This guide details the step-by-step installation of Memos on a Proxmox server. The fundamental design is that the container (LXC) be disposable. All notes and important information will persist on an external Synology NAS using the SMB protocol. In this way, in the event of any failure or accidental destruction of the container, the information will remain intact and automatically backed up (via Hyperbackup). It also includes configuration of Tailscale for secure remote access.
Phase 1: Environment Preparation (Synology and Proxmox)
The first step is to have the “foundations” ready: a safe place to store the data (NAS) and the equipment that will run the application (Proxmox LXC).
1.1 Preparation on the Synology NAS (SMB Sharing)
Let’s create a folder on Synology where only the data of the Docker container for Memos will live exclusively.
Steps to follow:
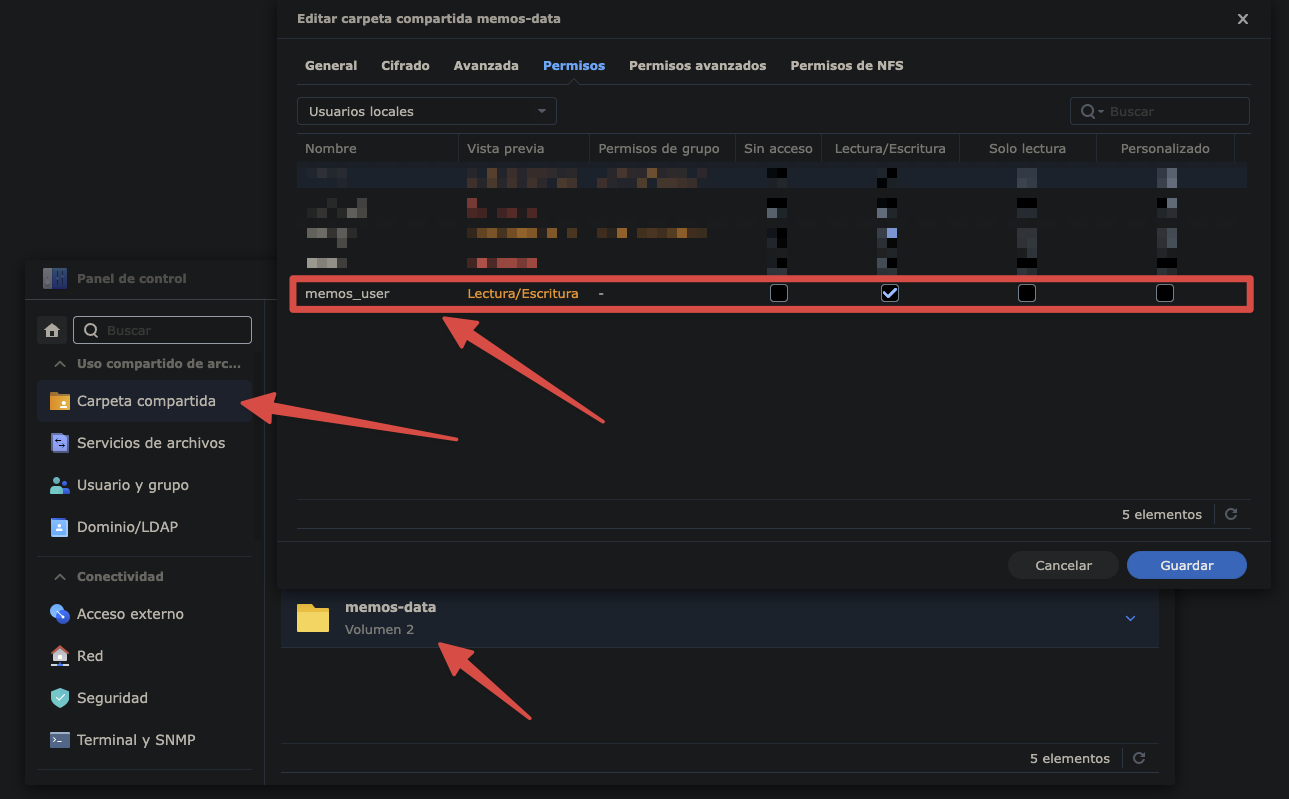
- Access the web interface of your Synology DSM.
- Go to the Control Panel > Shared Folder.
- Create a new shared folder. Name it, for example,
memos-data. - (Optional but recommended) Go to Control Panel > User and Group (User & Group) and create a dedicated user (for example,
memos_user). Give it a strong password. - Return to the Permissions of the folder
memos-dataand ensure that the usermemos_user(or your primary user if you decided not to create a new one) has Read/Write permissions.
1.2 Creating the LXC Container in Proxmox
We will use an LXC (Linux Container) container because it shares the kernel with the Proxmox host, being much faster and more efficient (consumes less memory RAM and CPU) than a complete virtual machine.
Steps to follow:
- Enter the web interface of your Proxmox.
- Above to the right, click on the blue button “Create CT” (Create Container).
- General Tab:
- Assign a
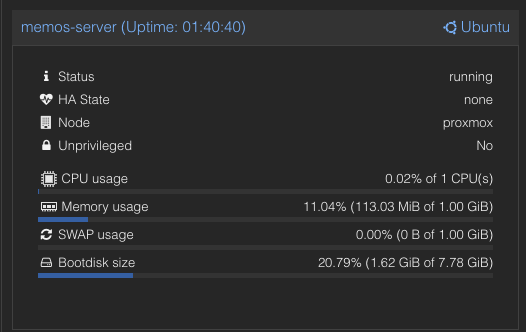
Hostname(example:memos-server). - Choose a password for the root user.
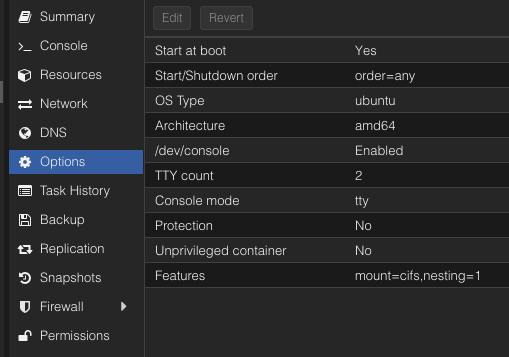
- VERY IMPORTANT: Uncheck (remove the tilde) the option “Unprivileged container”. Keep it unchecked. A Privileged container makes it much simpler to automatically mount network units (SMB) and use Docker inside the container.
- Assign a
- Template Tab: Select a base template (I strongly recommend
ubuntu-24.04-standardordebian-12-standard, depending on what you have downloaded in your local storage of Proxmox). - Disks Tab: 8 GB of storage is more than enough (Docker and the Operating System will only use a couple of GB, our actual data will be on the Synology).
- CPU Tab: Assign 1 or 2 cores.
- Memory Tab: 1024 MB (1 GB) is more than enough, Memos is very lightweight.
- Network Tab:
- Bridge:
vmbr0 - IPv4: Select “Static” and configure
192.168.8.99/24. - Gateway (IPv4):
192.168.8.1
- Bridge:
- VERY IMPORTANT (Enabling SMB and Docker in Proxmox): Before starting the container, go to the “Options” tab on the left side of your container. Look for the option “Features”, double-click it, and check the following two boxes:
- SMB/CIFS (For our Synology unit)
- Nesting (Required for Docker to function inside an LXC container)
- Finish creating and start the container.
Don’t you have internet in the container? (Bug of Ubuntu 24.04 on Proxmox) If you notice that the container doesn’t have internet when starting (error:
Temporary failure resolving), you need to force the network startup. In the container’s console, write:Baship link set eth0 up ip addr add 192.168.8.99/24 dev eth0 ip route add default via 192.168.8.1 echo "nameserver 1.1.1.1" > /etc/resolv.confMake sure to update the IPs with your own if you use others in the future.
Progress registration: Phase 1 Completed. The static IP 192.168.8.99 was successfully configured in Proxmox and the LXC creation was finalized.
Phase 2: Storage Configuration in the Container (SMB Mounting)
We already have our container created with the IP 192.168.8.99. Now we’re going to connect this container to the Synology folder using the SMB protocol, so that Memos saves everything there.
Steps to follow:
-
In the Proxmox interface, select your container on the left and press “Console” to open the command terminal.
-
Log in by typing
rootand the password you chose when creating it.Error
Temporary failure resolving? -
The first thing is to update packages and download the tool for reading SMB (
cifs-utils).Bashapt update && apt upgrade -y apt install cifs-utils -y -
Let’s create the local folder in the LXC that will serve as the “gateway” to the NAS:
Bashmkdir -p /mnt/synology/memos -
To not leave your Synology password in plain sight for everyone to see, we will create a hidden credentials file:
Bashnano /root/.smbcredentialsInside that file write the following (replace with your Synology username and password):
Textusername=tu_usuario_memos password=tu_contraseña_fuerteSaves by pressing
Ctrl+O, thenEnter, and exits withCtrl+X. -
We ensure the file is secure so that only
rootcan read the passwords:Bashchmod 600 /root/.smbcredentials -
Now let’s configure it to mount automatically every time the container boots up. We’ll edit the
/etc/fstabfile:Bashnano /etc/fstabAt the end of the file, add this line (make sure to change the IP for your Synology and the folder name if you gave it a different one):
Text//IP_DE_TU_SYNOLOGY/memos-data /mnt/synology/memos cifs credentials=/root/.smbcredentials,iocharset=utf8,file_mode=0777,dir_mode=0777,vers=3.0,nobrl 0 0Important: The
nobrloption (No Byte Range Lock) is critically mandatory to prevent the Memos database (SQLite) from freezing or locking (database is locked) when executed over the network via the SMB protocol. Save and exit withCtrl+O,Enter, andCtrl+X. -
We tested that everything went well by assembling the units:
Bashmount -aIf there’s no error message, it worked!
-
We verify that it’s installed by checking the free space:
Bashdf -hYou should see a line at the end that shows the complete size of your Synology disk pointing to
/mnt/synology/memos.
Progress registration: Phase 2 Completed. Synology folder successfully mounted and configured within the container at
/mnt/synology/memos.
Phase 3: Installation of Docker and Deployment of Memos
In this phase, we will install the Docker engine and instruct it to run Memos, storing all databases and multimedia files directly in the Synology path that we just connected.
Steps to follow:
-
Automatically Install Docker: Run the official installation script that will download and configure it in your LXC:
Bashcurl -fsSL https://get.docker.com -o get-docker.sh && sh get-docker.shError
sysctl net... permission deniedwhen booting on Proxmox? (Bug of containerd.io) If Docker doesn’t start containers throwing a permissions error overunprivileged_port_start, it’s due to a recent security update incompatible with Proxmox. To fix it, downgrade the previous version of containerd and block it by typing this in your console:Bashapt install --allow-downgrades containerd.io=1.7.28-1~ubuntu.24.04~noble apt-mark hold containerd.io systemctl restart docker -
Create a configuration folder for Memos: We will create a small place to store your
docker-compose.ymlfile (which is the instruction manual for Docker).Bashmkdir -p /opt/memos-docker cd /opt/memos-docker -
Create and edit the Docker Compose file:
Bashnano docker-compose.ymlCopy this content exactly into the file:
Yamlservices: memos: image: neosmemo/memos:stable container_name: memos restart: always security_opt: - apparmor:unconfined ports: - "5230:5230" volumes: - /mnt/synology/memos:/var/opt/memos(Note: The line
volumesensures that the internal folder of Memos points directly to our Synology). -
Start Memos! Execute the following command to run it in the background:
Bashdocker compose up -d -
Verify the status: If everything went well, you can see if Memos is on with the command:
Bashdocker ps
If this ends successfully, you’ll need to go to your web browser, enter http://192.168.8.99:5230, and you will receive the welcome screen of Memos.
Progress registration: Phase 3 Completed. Memos operating stably on port 5230.
Phase 4: Secure Remote Access with Tailscale
To quickly take notes from your cell phone while on the street using your mobile data, we’ll install Tailscale in this container. This creates a “invisible VPN tunnel” directly to Memos without needing to open any port on your physical router (which would be an enormous risk).
Steps to follow:
-
Install Tailscale: In the Proxmox console of the container, execute this official magic command:
Bashcurl -fsSL https://tailscale.com/install.sh | shError
Failed to start tailscaled.service(Missing/dev/net/tun)?- Go to the main web interface of Proxmox, select your “Node” (usually called
proxmoxorpve) on the left panel and click on the Shell tab. - Paste this command (replace
103with the numeric ID of your container if it’s different):
Bashecho -e "lxc.cgroup2.devices.allow: c 10:200 rwm\nlxc.mount.entry: /dev/net/tun dev/net/tun none bind,create=file" >> /etc/pve/lxc/103.conf- In the host’s console, restart the container to apply the changes:
Bashpct stop 103 && pct start 103After this, return to the Memos container console, and Tailscale will start automatically.
- Go to the main web interface of Proxmox, select your “Node” (usually called
-
Connect the node to your account:
Bashtailscale upA long link will appear on screen (e.g.
https://login.tailscale.com/a/xxxx). Copy it, open it in your browser and authorize this machine with your Google/GitHub/Microsoft account or the one you use for Tailscale. -
Find the Magic IP: Once logged in, go back to the terminal and execute:
Bashtailscale ip -4That IP starting with
100.x.x.xis the “Magic IP” of your container. -
Final Connection from your mobile:
- Install the Tailscale app on your mobile device and log in.
- Turn off Wi-Fi (to test your mobile data).
- Open your mobile phone’s browser and enter your Magic IP by following this format strictly:
http://100.x.x.x:5230
ATTENTION! Classic connection error (
ERR_CONNECTION_REFUSED)
And you’re done! You’ll have your note block with you always.
Final Demonstration
Here is how Memos looks working in real time through this private tunnel:
Progress registration: Phase 4 Completed. Remote access successfully enabled via Tailnet global configuration without port redirection in hardware.
Automated translation (technical mode).