Silakka54: Programmable Ergonomics
My experience building and configuring the Silakka54 keyboard.
of the text to English:
Rules:
- Output ONLY the translated text.
- NO conversational fillers like “Here is the translation” or “I assumed”.
- NO formatting in the output unless it was in the original (e.g., do not add ’#’ to titles).
- Do NOT add notes or corrections. Keep dates and facts exactly as they are.
Entry into the World of Programmable Keyboards: Silakka54
In the technological ecosystem, we often focus exclusively on software: we pursue the ultimate Linux distribution or optimize our desktop environment. I know that “burrow” well; I have dedicated entire days to refining my DWM configuration on Arch Linux, dealing with compilations and patches that sometimes compromised system stability – a setup that, although I still maintain it, defined my learning experience. However, between all the logical optimization, we often neglect the critical physical interface that connects us to the machine: the keyboard.
Although my base environment has been macOS for years, the recent integration of Aerospace as a tiling window manager exposed an unexpected friction: optimizing the operating system logically serves little purpose if the physical interface remains a bottleneck.
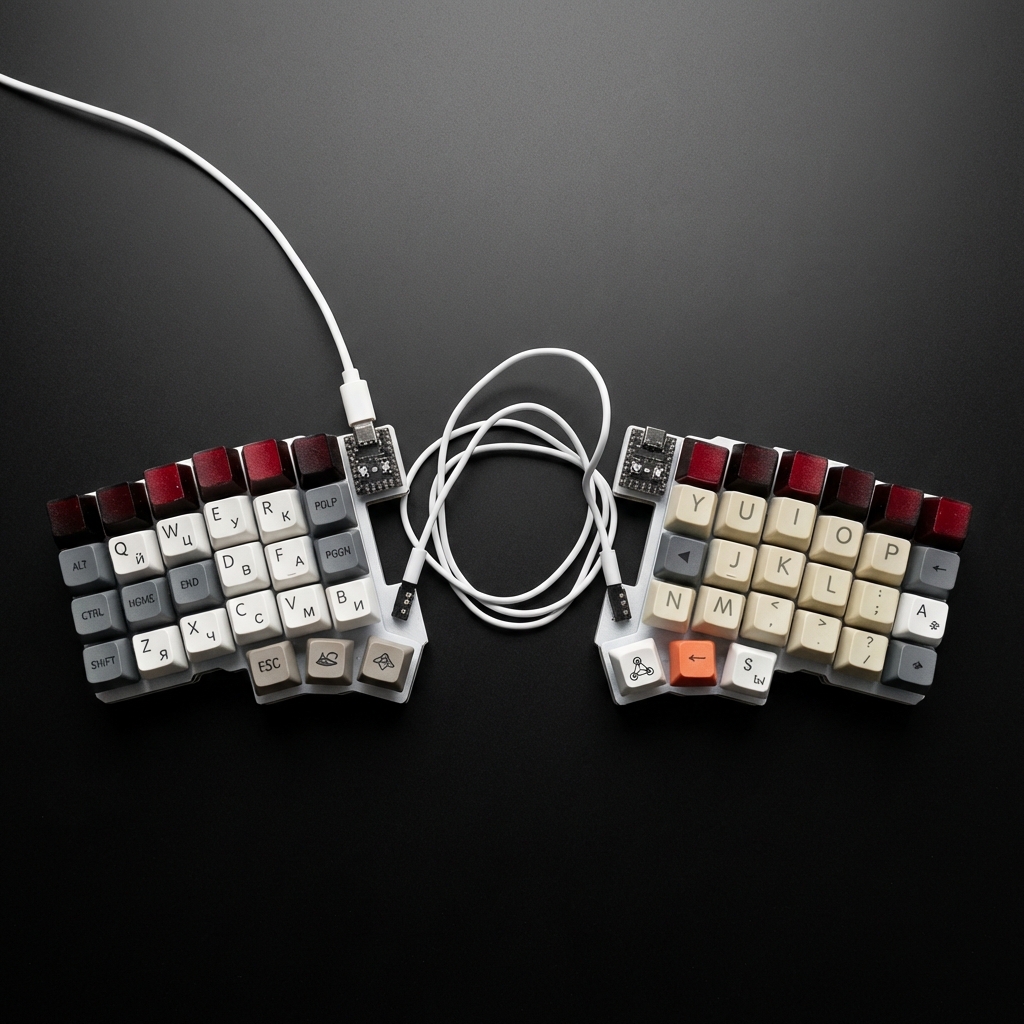
To solve this issue, I migrated to Silakka54 two months ago. This represents more than just adopting ergonomic hardware with a columnar stagger layout; it marks a total paradigm shift. This technical note details how I used the Vial firmware to design a logical keymap: although the device retains the physical numeric row, my configuration deliberately ignores certain keys. The goal is twofold: optimize my workflow in development and system administration, and train my muscle memory to transition to even more compact formats eventually.
Philosophy of Use: Simulating a Corne on Silakka54
Although the Silakka54 has 54 keys, including the numeric row and dedicated keys for Backspace or Esc in the corners, I do not use them.
My current philosophy is “Home Row Supremacy.” I have forced my configuration to ignore the top row.
-
What’s the goal? To never stretch my fingers more than one unit of distance from the resting position.
-
The logic: Use this keyboard as a training ground for transitioning eventually to a 3x6 Corne keyboard. The Silakka54 is an excellent entry point because extra keys are available “just in case,” eliminating initial anxiety, but discipline lies in not using them.
Engineering the Keymap: Logic Over Brute Force
Analyzing my configuration file .vil, I want to highlight logical solutions implemented for physical problems.
1. Combos and Eliminating Reach
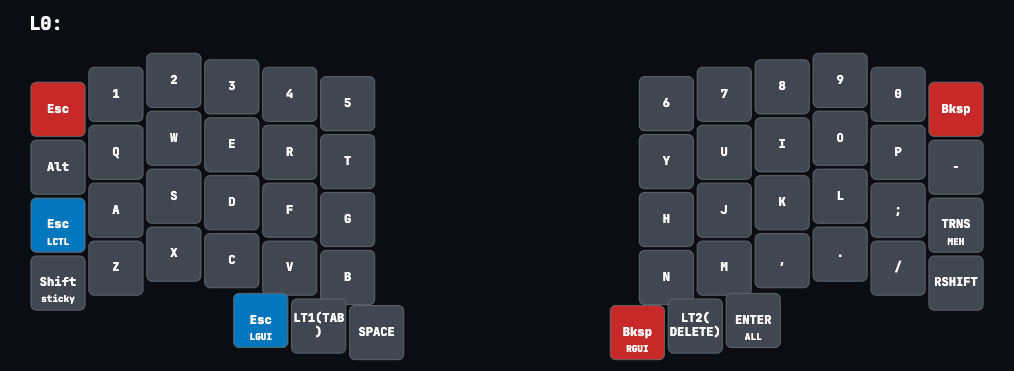
Instead of stretching my pinky towards the top-left corner to press Escape (a repetitive and harmful movement for Vim users), I have implemented a combo:
J+K=ESCAPEWhen I press these two keys from the home row simultaneously, the firmware sends the Escape signal. This allows me to exit modes in Vim or cancel dialogs without moving my hands a millimeter.
2. Optimizing SQL: Caps Word and Smart Shift
As an Systems Analyst student, I write much SQL. Best practices dictate that reserved words (SELECT, FROM, WHERE) should be in uppercase. Activating and deactivating the traditional Caps Lock is slow.
-
The Solution (Caps Word): When I press both Shifts (Left + Right) simultaneously, I activate the “Caps Word” mode. This mode maintains uppercase letters active only while writing; as soon as I press Space, it automatically deactivates. It’s a massive optimization for writing fluid SQL queries.
-
Traditional Caps Lock: If I really need permanent blocking (for long constants), I use a Double Tap on my Left Shift (configured as One Shot Modifier), anchoring the uppercase mode until further notice.
3. The “Super Keys”: Hyper and Meh
To avoid conflicts with native macOS or application shortcuts, I have configured complex modifier keys that do not exist on standard keyboards:
-
The Hyper Key (
ALL_T): Located in my right thumb (acting as Enter when pressed). When held down, it sends Ctrl + Shift + Alt + Gui simultaneously.- Usage: I use it exclusively for managing my Window Manager (Aerospace). If I press
Hyper+J, I know it’s an instruction for the operating system (moving a window), and it will never collide with browser or editor shortcuts.
- Usage: I use it exclusively for managing my Window Manager (Aerospace). If I press
4. Ergonomics of Thumbs (Thumb Clusters): Optimizing Stronger Fingers
In traditional keyboard design, there is a fundamental error: a massive space bar that occupies the area of both thumbs, but we always end up hitting it with the same finger. We waste the two strongest and most versatile fingers of our hand on a single function.
On my Silakka54, I have converted Thumb Clusters into the central control of the system, assigning critical functions through the logic of “Tap vs. Hold” (Touch vs. Sustain). If I touch the key, it does one thing; if I hold it down, it does another.
Based on my current configuration, this is how I distribute the load:
-
Right Hand (Editing and Control):
-
Backspace/Super: I have eliminated the Backspace from the distant top-right corner. Now resides in my right thumb (
RGui_T). When pressed, it erases; when held down, it acts as the Super key (Command on macOS / Windows Key on Windows). This transforms the act of deleting: we move from an extension lateral harmful to the pinky (the weaker finger) to a movement opposition by the thumb (the stronger movement). -
Delete/Navigaton: The central key (
LT 2) acts as Delete when pressed, but when held down, it gives access to my Layer 2 (where navigation arrows live).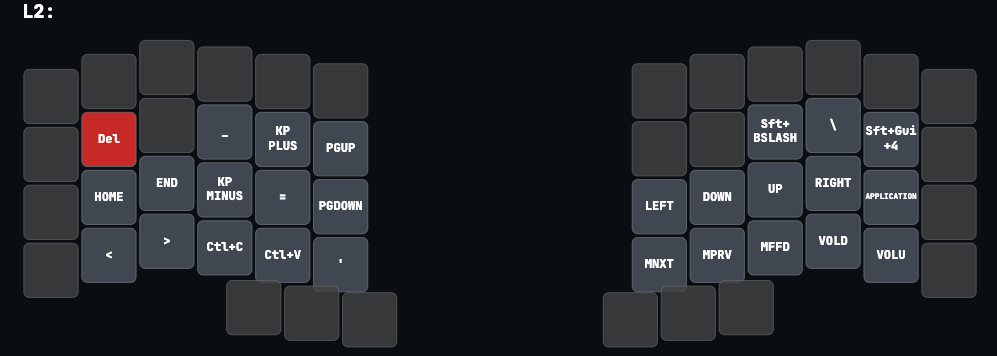
-
-
Left Hand (Typing):
- Space: The only key that remains with a “pure” and traditional function. Although I could assign it a dual behavior, I deliberately chose not to do so, ensuring an immediate and absolute response (zero latency). Any micro-processing delay here would affect the speed of writing, so it stays exclusively for inserting spaces.
This configuration does not only reduce fatigue but also keeps my hands static in the home row, delegating complexity to the thumbs instead of the wrists.
5. Tri-Layer and the Power of QMK/Vial
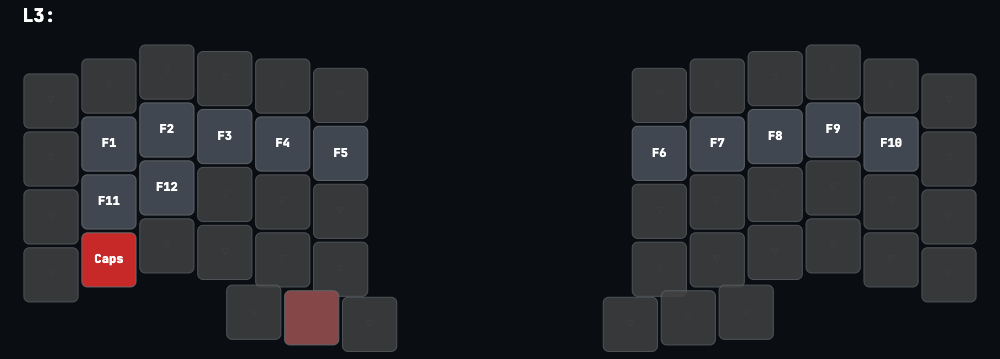
One of the most ingenious logical solutions I’ve implemented is access to my Layer 3. Instead of wasting a dedicated key for accessing it, I use a “ladder” or conditional logic:
- If I press the key of Layer 1 (Left Thumb) + the key of Layer 2 (Right Thumb) simultaneously, the firmware interprets the sum of both and transports me to Layer 3.
It’s an elegant solution for functions that I need but rarely use. In this layer “boring” reside my Function Keys (F1-F12) and a traditional Caps Lock (solitary and forgotten, since I prefer the Caps Word mode). They are available when needed, but invisible most of the time.
This versatility highlights the true power of a QMK/Vial firmware keyboard. The concept of layers is so robust that, even with my current configuration, I still have unused layers. My plan for the future is to use them as “system modes”: assign a key combination to change the keyboard’s internal behavior depending on whether I’m in Windows or Linux, remapping automatically without touching the system software.
Conclusion
After two months, the ortholinear layout feels natural, but what’s most valuable has been understanding that I don’t need more keys, I need better logic. The Silakka54 has allowed me to prototype my ideal workflow, reducing fatigue and increasing speed through intelligent software. My next goal is the transition to minimalistic hardware (Corne), but the mental transition is already complete thanks to this configuration.
Resources
If you’re interested in trying out my configuration or seeing more details, you can find the silakka54_main.vil file and more on my repository:
📂 Silakka54 Configuration (GitHub)
Automated translation.